Tuesday, September 27, 2011

No Sew Bunting/Banner Tutorial

 A few weeks ago, I had the lovely opportunity to help celebrate a very special friend. She is having her first baby in December and it is a girl! For the shower, I wanted to make something personal for Baby Annalee & something that maybe could be used in her nursery!

This is what I came up with! A personalized "bunting banner". You can see the rest of the pictures from the darling shower, here!


To make your own personalized banner (no sew style!), you will need the following:
Fabric Scraps
Hot glue gun
Spray Adhesive
Cardstock paper
Scissors

Let me begin by saying that if you have a super cool tool like a "Cricut," this project would probably be less time consuming. However, I don't have anything like that..so this was the easiest way for me. :)

To begin, iron all fabric.

Cut a triangle out of the cardstock. I free handed it..I don't measure. Ha! So, goodluck!
Then, cut the rest of your triangles.  You can make as many as you want.  Just make sure they are all the same size.


To begin on the first triangle, you will cut 2 triangles out of your fabric: 1 big and 1 the same size as paper cut traingle.

Cut the fabric to fit just over the paper. 
 It doesn't have to be perfect, because it will be covered up on the sides. 
 This will be the back of the banner.

Then cut a fabric triangle a little bit bigger than the previous fabric triangle.
Place it face down and cover with the paper and fabric triangle.
This will be the front of the banner.

If my directions don't make sense, maybe this picture will help. :)

Place hot glue on one side of triangle in the crease. Fold over fabric and hold.

Continue this step for the other two sides until complete!

Now for the letters...

To begin, I chose a font I liked on Microsoft Word.
I increased the size to 250 and printed it. Then I cut out the letters.  

Next, I taped the letters onto the fabric.
Then, I cut the letters out. Sounds hard, but it was pretty easy!


After that, I peeled the taped paper letter off of the fabric.

And finally, I had myself a fabric letter!
You made need to trim the edges. My fabric frayed a little, but it looked great after I trimmed it.  If you're going for a vintage look, you may like and want to keep the "frayed look."


I used the Elmer's Craft Bond Spray Adhesive to "glue" the fabric letter to the bunting.  Tip: You may want to use the spray adhesive outside over some scrap paper because the spray makes everything sticky!

You will end up with this!

Choose a ribbon you like and hot glue the back of the fabric triangles to the ribbon & you've got yourself a bunting banner!


"Annalee Ray"
This is the combo of lots of people's names in their family.
I love meaningful names!


Do you think YOU could make your own No Sew Bunting/Banner? I think so!

Monday, September 19, 2011

Baby Annalee's Shower!

This past weekend, we traveled to Abilene to celebrate one of my most wonderful childhood friends & her sweet baby girl who will be born in December! Ashlee is married to Dallas (who is also a childhood friend!), they live in the Houston area & have an adorable blog,  here! :)

I had the privilege to help plan the baby shower for Ashlee with another sweet childhood friend, Mrs. Kelsey Holson.  With the help of our moms and many other sweet ladies, we had a blast putting it all together!

I just can't wait for little Miss Annalee Ray to arrive. :)


 I just LOVE the way her banner turned out!
I'll be giving a tutorial on my "No-Sew Bunting" banner soon. Stay tuned!

 Kelsey made this adorable picture display of Annalee's Mommy & Daddy when they were babies! 

I wonder who she will resemble?

 Mom and I had a blast making white chocolate covered popcorn & assembling these adorable "Ready to Pop" bags! I found the idea, here, but I couldn't find the exact bags. So, we decided to make our own! Hobby Lobby had these polka-dot bags and we designed the "Ready to Pop" logo.


 Kelsey & her mom made individual "Cake in a Jar" for all of the guests! They turned out so cute.  I'm not sure where she found the idea, but I'm sure you can find it on Pintrest somewhere!

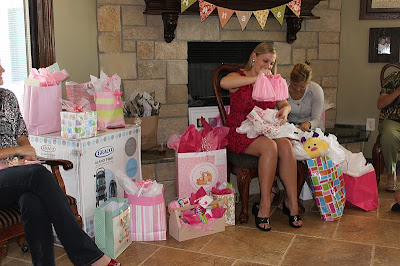
 Here is Ashlee opening gifts! She got so many precious things!


 Here is another craft project I had fun making for little Annalee.  Michaels was selling these baby clothes hangers for a $1.25. I snatched 3 of them and also purchased some pink letter stickers to write her name on the hangers.  Then, I used modge podge to make sure the stickers will stay on! It was a great  personalized, but super afforable & adorable gift. :)

 And, Annalee got Texas aTm booties....I'm shocked. Sic' em Annalee. :)

 The sweetest canvas painting to hang in her nursery...
 Annalee Ray, you are the cutest little love bug! Can't wait to meet you!

It was so fun to see these amazing girls--it's been way too long!

Thinking about the miracle of a child reminds me of an encouraging verse that I love so deeply.  It's so important to remember that we were made perfectly in the Lord's sight. Here's a little reminder of that...

"For you created my inmost being; 
you knit me together in my mother's womb. 
I praise you because I am fearfully and wonderfully made; 
your works are wonderful, 
I know that full well."

Psalm 139: 13-14 

Saturday, September 10, 2011

Fruit Loops & Rainbows

I've decided that as I learn & grow in my career as a Speech Therapist, I want to be consistently creative. I want to continually come up with new ideas for therapy & always keep it fun (for the kids & for me!)  So, as I "challenge" myself to think outside the box, I'm going to share some of my ideas on this blog.  It's mostly so that I can keep record of what I've done in therapy with my clients, but it's also to share with others! Maybe some of you out there are therapists, teachers, or you name it and maybe you can use some new ideas for your therapy or classroom, too!

These "ideas" were super easy & fun activities for the week! And, even better...they are all homeade. :) Here is what we did for our "Rainbow Week":

First, we SORTED the fruit loops into different colors.

Next, we organized the rainbow pictures from SMALLEST to LARGEST & vice versa.
 (For a few of my younger kiddos, I simplified this activity by having them arrange only 3 rainbow pictures.)


Finally, we made Fruit Loop Rainbows!


These activities were perfect because I was able use them for pretty much all of my clients to address each of their goals. This makes planning & preparing materials for the week super easy! Here are a few of the things we "learned" while making Fruit Loop Rainbows:

1. We learned a little bit about CATEGORIES and COLORS.  Splitting them all up into different groups according to the fruit loop's color.
2. We learned about SAME and DIFFERENT.  They are all the same because they are all fruit loops, but they are different because they are different colors.
3. We practiced ARTICULATION for various phonemes such as /k/ /g/ /s/ and many others in between gluing fruit loops onto our rainbow.
4. We practiced COUNTING the fruit loops
5. We answered SPATIAL questions such as, "Which color of the rainbow is ABOVE/BELOW the green?" or "Which color of the rainbow is at the BOTTOM/TOP? " "What color fruit loops comes FIRST/NEXT/ LAST?"
6. We learned to put pictures in order by size from little to big.


If you have any fun ideas involving educational activities please share them! I love keeping it fun & different. Some of my favorites include: crafts, games, food & snacks, music and more... I would LOVE to hear what your ideas are, too!


Friday, September 9, 2011

Labor Day in Florida

The hubs & I had a blast in Florida over Labor Day Weekend celebrating our 1 year anniversary! I'm beginning to think that it was a GENIUS idea to get married over Labor Day Weekend. Since we have a holiday on Monday, we will always have a 3 day weekend to celebrate our anniversary!

However, there is one little thing that just might get in the way of our anniversary celebrations later on down the road....  This thing is called "Opening Weekend for Dove Hunting Season" which just so happens to be Labor Day Weekend, every year. So, with that being said, Mr. Phillip, I really appreciate you spending your weekend with your wife of 1 year. :) To my dad, brother & all of my husband's friends who invited him to go dove hunting this year...SORRY! :)

We'll see what happens next year & the year after that... hmm....


We actually didn't take many pictures of our trip, but here are a few from my phone:


We had a blast laying on the beach in Fort Lauderdale & we loved DisneyWorld!
It was a perfect anniversary weekend!